Thursday, August 22, 2024

Summer 2024 - Handmade Greeting Card Workshop, August 14 & 17, 2024

Hello everyone,

Hope you are doing well and staying cool.

Below is a recap of the cards we made in our last Handmade Greeting Card class.

Registration for the Fall session will be available starting Monday, August 19, 2024, and the Handmade Greeting Card Workshop will begin on Wednesday, September 18, 2024 at the Malaga Cove Campus.

Enjoy the rest of Summer and see you in September.

Connie

Watercolor 3D-Emboss Peacock: Spray water to saturate the watercolor paper before adding blue and green H2O watercolor to cover paper panel. Add drops of gold watercolor to add accent color panel. Dry off panel before embossing image using 3D Dancing Peacock embossing folder. Add gold corner sticker and sentiment to finish card as shown.

Pastel Dragonflies: Stamp dragonfly images using clear VersaMark ink onto white card panel. Sponge on pink, yellow, green and blue chalks to color stamped images. Brush off powder and emboss panel with diamond embossing folder. Add ribbon and sentiment to finish card as shown.

Faux Embossed Fern Leaf: Stamp leaf with white ink onto green card panel. Move card panel about 1/16" and stamp same image with green ink on top of the previously stamped image to give a faux embossed look. Add gems and green bow to finish card as shown.

Vellum Flowers Birthday (front): Glue embossed floral vellum panel onto front of peach card base. Wrap ribbon around small peach card panel and adhere to vellum card front. Stamp sentiment onto scallop circle and adhere on top of ribbon panel. Add gems and butterfly on top.

Vellum Flowers Birthday (inside): Glue pop-up mechanism inside of the peach card base. Adhere one end of the acetate strips to each end of the pop-up mechanism. Adhere the butterflies onto the other end of the pop-up mechanism. Stamp sentiment onto white card panel and adhere on top of peach card panel before adhering to the top of the pop-up mechanism.


Sunday, August 18, 2024

Summer 2024 - Gel Printing Workshop, August 7, 2024

Hello everyone,

Hope you are doing well and staying cool.

Below is a recap of the cards we made in our last Gel Printing class.

Registration for the Fall session will be available starting Monday, August 19, 2024, and the Gel Printing class will begin on Wednesday, September 11, 2024 at the Malaga Cove Campus.

Enjoy the rest of Summer and see you in September.

Connie

Flowers in Vase: Brayer different color acrylic paints and apply different texture tools to pull various different color prints for the flowers, leaves, vase and background. Use different dies to cut out flowers, leaves, vase and background and assemble together as shown.

Gold Emboss Abstracts: Brayer yellow ink in the center and orange ink on both sides onto gel plate. Place rose stencil onto plate and place paper on top to lift rose pattern. Remove the stencil, flip the paper around to add the remaining pattern onto the paper. Die cut frame, stamp and heat emboss image with gold embossing powder.

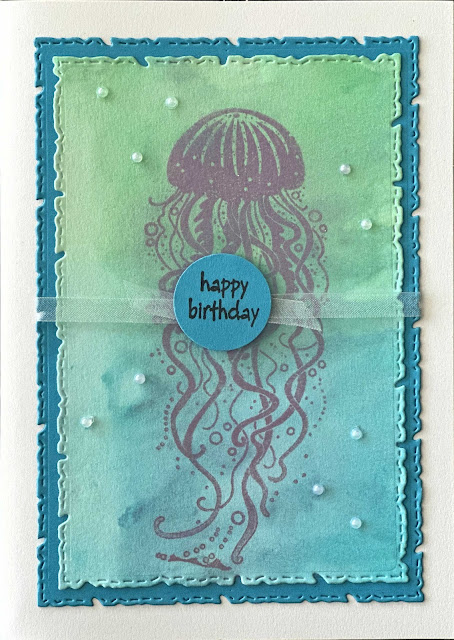
Perfect Pearl Jelly Fish: Spray Green and Blue Distress Mica Stains onto gel plate. Place mixed media paper onto plate to pick up background. Dry well before stamping jelly fish image with VersaMark ink.

Rose Bouquets in Pastel: Stamp rose bouquet onto gel plate with StazOn Timber Brown ink. When ink dried, brayer some light yellow, pink, green and iridescent white acrylic paint over stamped images. Place paper on top and rub well to pull print. Die cut frame, add ribbon and stamp sentiment before assembling card as shown.

Thursday, August 8, 2024

Summer 2024 - Handmade Greeting Card Workshop July 31, 2024

Hello everyone,

Hope you are keeping cool. Below is a recap of the cards we made in previous class. Next Wednesday, August 14th (or Saturday, August 17th) will be our last class meeting for the Summer session.

See you in class.

Connie

3D Emboss Daisy w/ Alcohol Inks: Add a couple drop of yellow and green alcohol inks and some blending solution onto a felt applicator. Apply ink onto Yupo paper by using slight twisting motion. Be careful not to over blending and mixing the colors together. Apply Alcohol Lift ink onto the 3D Embossing Folder, place the alcohol inked panel in the embossing folder to emboss the image. Use some paper towel to immediately wipe off all the Lift ink from the Yupo paper to reveal the embossed image. Assemble card by adding ribbon, stamped sentiment and gems as shown.

Faux Watercolor Roses: Apply Abandoned Coral, Fired Brick, Twisted Citron and Cracked Pistachio Distress Oxide inks onto rose stamp using sponge daubers. Lightly spritz water onto stamp and stamp images onto watercolor paper twice as shown. Use water brush to lightly brush over and around stamped images to create the watercolor wash as shown. Add corner and sentiment stickers before adhering to rose card base.

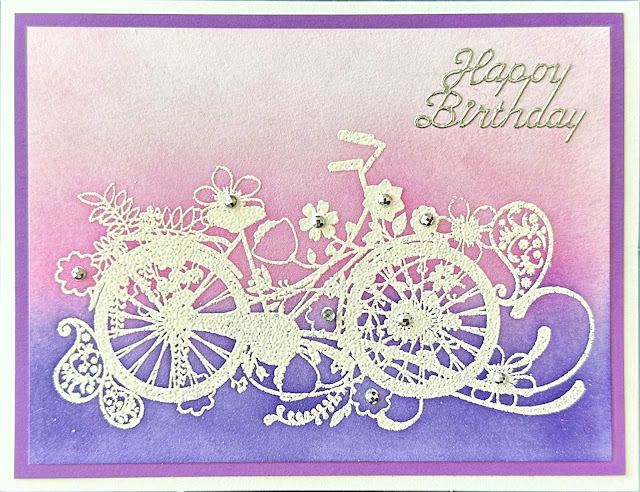
Embossed BDay Bike: Stamp and heat emboss bicycle using white embossing powder. Sponge Rose Bud, Lilac Posies and Grape Jelly Memento inks onto embossed card panel. Add gems and sentiment sticker and adhere panel onto purple mat before adhering onto white card base.

Stencil Butterfly:  Place swirls stencil onto white card panel and lightly sponge Warm Breeze Versafine Clair ink over top. Remove stencil and stamp butterfly image using black ink. Adhere panel onto black mat. Add stamp sentiment, gems and bow to finish card as shown.


Monday, August 5, 2024

Summer 2024 - Gel Printing Workshop July 24, 2024

Hello everyone,

Below is a recap of the cards we made previously. Next class meeting will be on August 7, 2024. Take care and stay cool.

Connie

Best Wishes Flowers: Brayer a thin layer of shimmer paint medium onto gel plate. Put a couple drops of purple and pink glitter watercolor over the paint medium and lightly brayer without over blending the colors. Place flower stencil on top and place paper over the stencil. Rub evenly to pick up the floral design and lift print. Remove stencil and place the lifted print back onto gel plate after turning the image around to pick up the rest of the image left behind by the stencil. Die cut to size and add ribbon, gems and sentiment sticker before adhering to card base as shown.

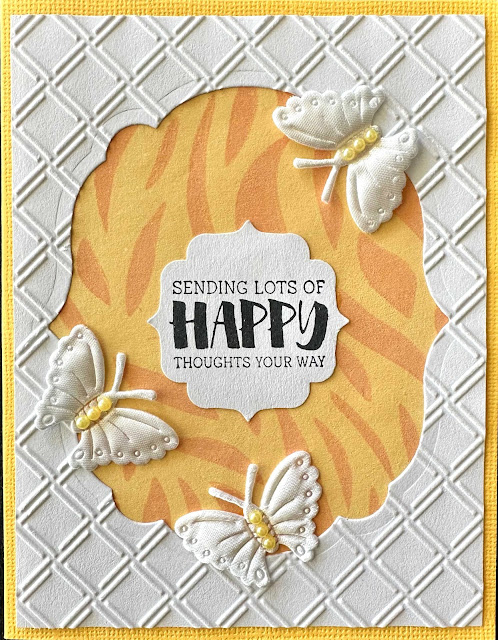
Happy Butterflies: Brayer Scattered Straw Distress Oxide ink on gel plate. Place paper and pull 1st background print. Brayer Spiced Marmalade and Abandoned Coral on gel plate; Place swirl stencil on top and place the 1st background print over top. Rub all over to transfer the swirl pattern onto print. Die cut print to size and adhere behind white trellis die cut card panel. Add butterflies and stamp sentiment before adhering to yellow card base as shown.

Wild Birthday Lions: Brayer copper acrylic paint evenly over gel plate. Crumble a piece of tissue paper and place over the inked gel plate. Tap lightly to pick up the copper paint while leaving the pattern behind. Die cut to size and stamp images with black ink and heat emboss with clear embossing powder. Adhere onto black panel before placing over card base.

Birthday Flowers: Brayer a thin layer of green acrylic paint onto gel plate. Place artificial flower on top to lift green paint and leaving floral images. Let dry before applying Perfect Pearl gold and pink powder on the flower images. Brayer a thin layer of iridescent white paint over the gel plate. Place paper on top and rub really well for at least a few minutes to make sure the different layers of paint are transferred onto paper. Die cut print, weave in ribbon, add gems and stamp sentiment, and adhere onto pink card panel before placing onto white card base.


Fall 2024 - Handmade Greeting Card Workshop, November 6, 2024

Hello everyone, Hope you are doing well. Here is a quick recap of the cards we made last time. Next class meeting will be November 20, 2024....