Hello everyone,
It has been a busy week with work and doctor appointments. At least I get to go to the Rubber Stamp Convention on Saturday and met up with Alice and Mona. Spending money again as usual, but it was fun!
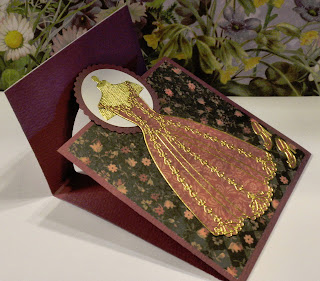
Just a quick post to recap the cards we did in class a week ago. This dress card was made using Starform stickers (dress and dress form). The burgundy card base was 4-1/4" x 11", scored at 4-1/4 and 8-1/2". I die cut a circle on the 8-1/2" score line and adhere a 4" x 4" floral pattern paper onto the front card stock. Adhere the lace pattern paper onto the front flap as shown. Tie a small strip of burgundy ribbon to the right opening as shown and adhere sentiment sticker.
 A burgundy scallop circle slightly smaller than the circle opening was adhered onto the card front in the center of the opening as shown below. A
smaller white circle was adhered onto the burgundy scallop circle. Adhere the dress sticker onto the rose pattern paper and cut out. Adhere the dress form on to the white circle and adhere the dress cut-out onto the dress form. Adhere the gloves and heels onto rose pattern paper and cut out. Adhere the cut outs onto card as shown to finish.
A burgundy scallop circle slightly smaller than the circle opening was adhered onto the card front in the center of the opening as shown below. A
smaller white circle was adhered onto the burgundy scallop circle. Adhere the dress sticker onto the rose pattern paper and cut out. Adhere the dress form on to the white circle and adhere the dress cut-out onto the dress form. Adhere the gloves and heels onto rose pattern paper and cut out. Adhere the cut outs onto card as shown to finish.
 This card is long overdue. I don't know about you, but time always seems to slip away from me. So I was really happy to find this dollar clear stamp. It says "Better late then never..." on the inside. Simple stamp with black ink and color with watercolor pencil on watercolor paper. Mat on brown card stock to match the card base. Add silver brad stickers as shown to finish.
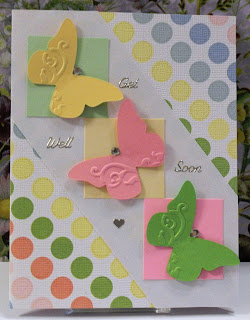
 This butterflies card was made using Stampin'Up die. We used the smaller butterflies in a previous card and thought I would used the large one in this Spring card. The white strip actually has a shimmery background. I bought the squares pre-cut. Th butterflies were adhered onto squares with glue dots in the center only. Add clear gems in the center and stickers to finish.
 This last card was made using a chalking technique with Versamark ink. I know some might not like it, but it actually very easy and fun. The pink panel was made by using a Spellbinder die to cut out shape and sponge on pink chalk using a cotton ball. The image was then stamped onto panel using clear Versamark ink and apply more pink chalk with same cotton ball onto stamped image. Like magic, the image appeared in bright pink color as shown. A shimmer pearl mist (by Ranger) was sprayed lightly on top to give it some shine. Unfortunately, you can really see it in the picture. Tie a burgundy ribbon on the right, add blings on the left and finished off with sentiment on a scallop oval on the right with some foam tape. Since the burgundy card base was not very sturdy, a rose piece of paper was added on the inside. It also provide a lighter background to add personalized greetings.

Next Monday March 18th will be our last class for the Winter Session. The Spring Session will start on April 1st (it's no April fools). There will be 4 class meetings again, 4/1, 4/15, 4/29 and 5/13. So be sure to sign up! Have a great week!
It has been a busy week with work and doctor appointments. At least I get to go to the Rubber Stamp Convention on Saturday and met up with Alice and Mona. Spending money again as usual, but it was fun!
Just a quick post to recap the cards we did in class a week ago. This dress card was made using Starform stickers (dress and dress form). The burgundy card base was 4-1/4" x 11", scored at 4-1/4 and 8-1/2". I die cut a circle on the 8-1/2" score line and adhere a 4" x 4" floral pattern paper onto the front card stock. Adhere the lace pattern paper onto the front flap as shown. Tie a small strip of burgundy ribbon to the right opening as shown and adhere sentiment sticker.


Next Monday March 18th will be our last class for the Winter Session. The Spring Session will start on April 1st (it's no April fools). There will be 4 class meetings again, 4/1, 4/15, 4/29 and 5/13. So be sure to sign up! Have a great week!


No comments:
Post a Comment
Please leave a message for me and let me know what you think!