Monday, December 18, 2023

Gel Press Monoprinting - December 13, 2023

Hello everyone,

Below is a quick recap of the cards we made in class last week. FYI, the PVPUSD Winter 2024 class schedule is now posted online.

Enjoy a safe and happy holiday season with your family and friends! See you all in 2024.

Take care,

Connie
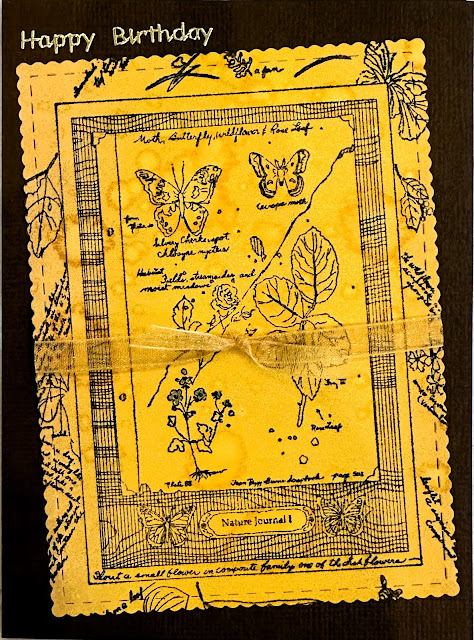
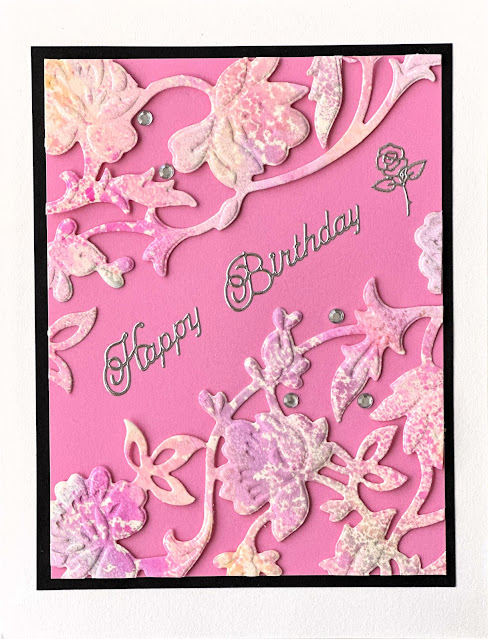
Butterflies Floral Birthday: Brayer Tea Dye, Wild Honey & Vintage Photo to pick up the 1st print. Roll remaining ink on brayer onto gel plate, spritz or sprinkle some water drops on gel plate and replace the 1st print onto gel plate to pick up the water distress look. Stamp image with black ink onto background print. Use scallop rectangle stitch die to cut out shape. Add ribbon and sentiment sticker and adhere on brown card base to finish card as shown.

Butterflies Floral Birthday: Paint image with H2O colors as an option to add more interest.

Embossed Pine Cones: Emboss ivory card panel with Alternew Pine Cone 3D Embossing Folder. Brayer some Mowed Lawn or Peeled Paint Distress ink on gel plate. Place embossed panel onto gel plate and lightly rub the embossed image to pick up ink. Use another brayer to apply darker color ink (Pine Needles or Forest Moss) to create another layer of dimension. Add twine and stamped sentiment before adhering onto gold mat and ivory card base to finish card as shown.

Warmed Wishes Poinsettia: Emboss white card panel with Alternew Poinsettia 3D Embossing Folder. Brayer Abandoned Coral Distress Oxide ink onto gel plate. Place embossed white card panel onto gel plate and lightly rub the embossed image to pick up ink onto embossed white card panel. Lift off card panel and place another white sheet of paper to pick up the ghost image left behind for the green card below. (Roll remaining ink on brayer onto gel plate and replace the previously inked embossed image onto gel plate to obtain a darker color. Add ribbon and stamped sentiment before adhering to red card base to finish card as shown)

Happy Birthday Poinsettia: Use the ghost print lifted from the previous card (above), die cut shape and place into the same poinsettia 3D embossing folder, lining up the image of the print with the embossing folder to emboss image. Adhere to green card base, add twine and sentiment sticker to finish card.


Tuesday, December 12, 2023

Handmade Greeting Card Workshop - December 6 & 9, 2023

Hello everyone,

Hope you are doing well. 

Below is a quick recap of the cards we made in our class last week. FYI, the PVPUSD Winter 2024 class schedule is now posted online.

Enjoy a safe and happy holiday season with your family and friends! See you all in 2024.

Take care,

Connie

Holiday Serviette (napkin) Card: Using Mod Podge to adhere cocktail napkin design on white card panel and vellum to create a 3D affect.

Birthday or Holiday Wreath: Score gray panel and swipe gray flannel Memento ink along the debossed side to create weather wood background.

Snowflakes Shaker: Die cut snowflake opening from white card panel; sponge and stamp snowflakes around opening as shown. Wrap a square white card panel with acetate to form a pouch, put some sequins and flakes inside and seal shut; tape shaker pouch to the back of stamped card panel. Add ribbon, sentiment and adhere to gray card base as shown.

Thinking of You Floral: Adhere white square panel onto floral paper in a diamond shape as shown. Adhere blue paper strips one at a time lining up to each corner of the center piece. Cut off excess and adhere to blue card base. Add sticker sentiment to finish card as shown.


Gel Press Monoprinting - November 29, 2023

Hello everyone,

Hope you are doing well.

Below is a quick recap of the Gel Print cards we made in our last class. 

Take care,

Connie

Die Cut Trees on Mowed Lawn & Peeled Paint distress ink stenciled background

Gold Heat Embossed Flowers on Picked Raspberry & Abandoned Coral distress ink stenciled background

Embossed Seashells on Tumble Glass and Antique Linen distress oxide ink background

Negative Seashells Print on Tumble Glass and Antique Linen distress oxide ink background (image left behind from card above)


Thursday, November 23, 2023

Handmade Greeting Card Workshop - November 15 & 18, 2023

Happy Thanksgiving everyone!

Below is a recap of the cards we made last week. Our next and final class meeting for the Fall session will be on Wednesday and Saturday, December 6 and December 9, 2023, respectively.

Take care,

Connie

Embossed Clocks: Place removable tapes around white card panel to create border. Sponge on Peeled Paint and Faded Jeans Distress Inks, brush Perfect Pearl powder all over (brush off excess) and lightly mist water over panel. Remove tapes and emboss with Clocks embossing folder. Add sentiment and assemble card as shown.

Peacock Feathers Birthday: Sponge Mustard Seed, Peacock Feathers & Wilted Violet Distress Inks on watercolor paper. Place inked panel onto a die cut plate, add Peacock Feathers stencil place on top, spray water all over, add another clean watercolor paper on top, cover with another die cut plate and run through machine to emboss and transfer the inked image to the 2nd watercolor paper (see image below). Die cut embossed inked panel with stitch frame and assemble card with ribbon, sequin, gems and sentiment as shown.
 
Peacock Feathers Thank You: Use the 2nd watercolor paper (see descriptions above). Die cut embossed inked panel with stitch frame and assemble card with ribbon, sequin, gems and sentiment as shown.

Pop-Up Puffin-front: Stamp and color images with watercolor pencils. Adhere card front with pattern paper and one of the stamped image.

Pop-Up Puffin-inside: Fold white panel in half, measure 1.5" from both outside edges of fold. Measure 1" from the fold line inward and draw vertical and horizontal lines to meet. Cut only the 2 vertical lines up to the 1" horizontal line. Fold to crease the horizontal line to create the pop up fold. Add the second stamp image and sentiment as shown.


Thursday, November 16, 2023

Gel Press Monoprinting - November 8, 2023

Hello everyone,

Hope you are all doing well. Can you believe next week is Thanksgiving? The holiday season is already here and another year is almost over. How time flies!

A quick reminder, PVPUSD is on Thanksgiving break all week next week. Our next class meeting will be on the following Wednesday, November 29, 2023.

Below is a quick recap of the cards we made last week.

Happy Thanksgiving!

Connie

Ocean Scene Birthday: Brayer Cracked Pistachio & Twisted Citron Distress Oxide Inks onto gel plate; Use bubble wrap to stamp bubbles on gel plate to create 1st layer background print. Brayer Salty Ocean & Peacock Feathers Distress Oxide Inks onto gel plate. Stamp Octopus on gel plate and place 1st layer background print onto gel plate to pick up 2nd layer print. Die cut print and add ocean scene die cut, sentiment and gems to finish card as shown.


Floral Vase Collage Birthday: Brayer Scattered Straw, Spun Sugar & Abandoned Coral Distress Oxide Ink onto gel plate to create color background. Stamp vase image, cut to size and assemble card with ribbon & stamp sentiment as shown.

Floral Thank You: Brayer Picked Raspberry & Dusty Concord Distress Inks onto gel plate; place floral stencil onto gel plate; place a clean sheet of paper on top and rub all over to pull the 1st background image. Remove stencil, place another clean sheet of paper and rub all over to pull the 2nd background print. Die cut 2nd background print with rectangular scallop stitch die and assemble cared with stamp sentiment, gems and bakers twine to finish card as shown.

Emboss Birthday Butterflies: Stamp & Heat Emboss Butterflies with gold embossing powder. Brayer Mustard Seed, Spiced Marmalade & Barn Door Distress Inks onto gel plate. Place embossed butterflies panel onto gel plate to add color background. Add ribbon, gems and sentiment to finish card as shown.

Wednesday, November 8, 2023

Handmade Greeting Card Workshop - November 1 & 4, 2023

Hello everyone,

Hope you are enjoying the Fall weather. Next Card Making class will be on November 15 (Wednesday's class) and November 18 (Saturday's class).

Below is a recap of the cards we made last week.

Take care,

Connie

Daisies Birthday: Stamp daisies with VersaMark clear ink on black card panel. Brush on gold, green and blue Perfect Pearl powders to color daisies. Lightly mist water over panel to set the powder. Add ribbon and sentiment to finish card as shown.

Angel Fish Iris Folding: Follow Iris pattern, starting with 1-pink, 2-yellow and 3-blue. Repeat the same color order to finish. Use double sided tape to mount finished Iris panel onto dark blue card panel before mounting onto white card base. Add sentiment sticker and black gem for eye to finish.

Butterflies Thank You: Place butterfly mask onto white card panel, brush green, blue and purple color in the opening for each butterfly. Move mask and repeat process for the rest of the butterflies. Lightly brush on blue ink on the panel background. Use black ink to stamp butterfly images onto colored butterfly backgrounds. Mount butterflies panel onto blue panel. Add ribbon and sentiment as shown to finish card as shown.

Fun Fold Flowers: Fold along score lines of card base and adhere embossed pattern card panels onto each folded section. Stamp flowers and sentiment, assemble panels together as shown.


Gel Press Monoprinting - October 25, 2023

Hello everyone,

Hope you are doing well.

Below is a quick recap of the cards we made in class.

Take care,

Connie

Stenciled Perfect Pearl Dragonflies in Light Blue Background

Embossed Gold & Red Marble Heart

Zebra in Gold & Yellow Tree Branch Background

Floral Die Cut w/ Dylusion Color Spray Background


Saturday, October 14, 2023

Fall Handmade Greeting Card Workshop - October 11 & 14, 2023

Hello everyone,

Hope you are doing well and enjoying the nice weather. 

Please note that our next class will be in 3 weeks. Wednesday's class will be on November 1st and Saturday's class will be on November 4th.

Below is a recap of the cards we made this week. I will send out a picture of the new cards later.

Take care,

Connie

Turquoise Butterflies: Brush on Rose Bud, Dandelion and Bahama Blue Memento inks all over white card strip. Place stencil over ink strip and sponge Paris Night Memento ink over the opening of the stencil to add swirl patterns. Lightly sponge edge with same Paris Night ink. Add ribbon, butterflies and sentiment sticker to finish card as shown.

Rose Floral Butterfly: Stamp butterflies on bush with Rhubarb Stalk Memento ink onto white card panel. Stamp off lacy branch before stamping onto same card panel. Lightly sponge same ink around the edges. Add ribbon and sentiment to finish card as shown.

Bleach Pansies: Stamp and heat emboss pansies with black embossing powder. Using a small brush, paint the inside of the flowers and leaves with household bleach. Color image using Prismacolor pencils.  Add ribbon and sticker sentiment as shown.

Red Berries Birthday: Add Cranberry, Watermelon and Gold alcohol inks and some alcohol blending solution on felt applicator and sponge all over Yupo paper panel. Place berries stencil over Yupo inked panel and tape in the back to secure in place. Using a clean sponge with a few drops of alcohol lift ink, sponge onto open areas of stencil to and lift the colors from the inked panel. Add ribbon and sentiment to finish card as shown.


Friday, October 13, 2023

Fall Gel Press Monoprinting - October 4, 2023

Hello everyone,

Hope you are doing well.

I want to remind everyone there will be no class next week. Our next class will meet on Wednesday, October 25, 2023. I will try to email you pictures of the new cards as soon as I have them completed.

Below is a recap of the cards we made in our previous class.

Take care,

Connie

Birthday Lion: Lightly sprinkle some baby powder over gel plate, add some yellow acrylic paint and brayer evenly to pull the 1st layer background print. Without cleaning the gel plate, add some copper acrylic paint, brayer evenly, sprinkle a bit more baby powder over top and then place the 1st layer background print onto gel plate to pull the final background print. Brush off any the powder from the background print before stamping and embossing the lion and tree image with black embossing powder. Die cut image and finish card as shown.

Pink & Purple Leaves: Add some magenta acrylic paint onto gel plate, brayer evenly and pick up the 1st layer background print.  Add some violet acrylic paint onto gel plate, brayer evenly, place leaves on gel plate. Place the 1st layer background print on top, rub all over and lift one side at a time to remove leaves and rub again to pick up the veins that left behind from the leaves. Assemble card with stamped sentiment, ribbon and butterflies as shown.

Thinking of You: Add yellow and pink acrylic paints onto gel plate and brayer evenly. Place 3D emboss panel over gel plate to add pattern and pick up 1st layer background print. Clean gel plate, add green metalic paint and brayer evenly. Place floral die cut panel on top, place 1st layer background print on gel plate and rub all over to add the green paint onto 1st background print. Cut to size with die cut and emboss with 3D embossing folder. Assemble card with stamped sentiment, ribbon and gems as shown.

Perfect Pearl Octopus: Place octopus stencil onto gel plate and lightly brush on Perfect Pearl color powders for the images. Remove stencil, add some white iridescent paint and brayer evenly. Place paper on gel plate and rub all over to pick up image. Die cut shape and assemble card as shown.


Monday, October 9, 2023

Fall Handmade Greeting Cards - September 27 and 30, 2023

Hello everyone,

Hope you are doing well.

Below is a recap of the cards we made in our previous class. See you soon.

Take care,

Connie

Gold Butterfly: Stamp butterfly with Versamark ink on purple card panel and heat emboss with gold embossing powder. Add ribbon, gems and sentiment sticker to finish card as shown.

Birthday Bird: Add rubbing alcohol to a cotton ball and put a few drops of red, purple and silver reinker onto same cotton ball. Rub onto all over onto glossy card panel. Be careful not to over mix the colors. Stamp bird onto panel with StazOn black permanent ink. Embellish with ribbon and stamped sentiment and finish card as shown.

3D Emboss Birthday: Cover panel edges with removal tapes, sponge yellow, pink and purple ink onto panel, and brush gold Perfect Pearl powder all over the inked area. Spray a light mist of water over panel to set the powder. Emboss the image using a 3D embossing folder. Assemble card with string, gems and sentiment as shown.

Moonlight Thank You: Using circular mask to cover over white card panel. Lightly sponge around opening with Warm Breeze Versafine Clair ink, add small circle mask for the moon and sponge around to add more color. Stamp floral sprigs and butterflies in the opening as shown. Add gems, ribbon and stamp sentiment to finish card.


Wednesday, September 27, 2023

Fall Gel Press Monoprinting - September 20, 2023

Hello everyone,

Hope you are doing well.  Below is a recap of the cards we made in our first class meeting. I will send out a reminder with the cards for our next class later.

Take care,

Connie

Butterflies Basket: White Heat Emboss stamped image; Brayer Wilted Violet, Cracked Pistachio & Twisted Citron distress oxide inks on gel plate. Place stamped image on top to pick up background colors. Die cut with rectangular stitch dies and add gems to finish card as shown.


Autumn Leaves: Brayer Mustard Seeds, Spiced Marmalade & Barn Door distress inks onto gel plate; Stamp swirl image on gel plate; place paper to lift background. Die cut frame and dry emboss with embossing folder. Lightly rub gold ink pad over the embossed image. Assemble card with die cut leaves, stamped sentiment and gems as shown.

Debossed Falling Petals: Die cut stitch frame and deboss panel with embossing folder. Brayer Wilted Violet & Mowed Lawn distress ink onto gel plate. Place the deboss card panel over plate to lift inked background. Assemble card with ribbon, gems and stamped sentiment as shown.

Embossed Falling Petals: After lifting the background ink for the previous card, place a clean paper onto gel plate to pick up the image left behind. Die cut panel and place it into the embossing folder to emboss image. Assemble card with ribbon, sticker sentiment, butterflies and gems as shown.


Thursday, September 21, 2023

Fall Handmade Greeting Card Workshop - September 13 & 16, 2023

Hello everyone,

Hope you are having a great day!

Below is a recap of the cards we made at our first class meeting. See you all at the next class.

Take care,

Connie

3D Floral Emboss Birthday: Sponge alcohol ink onto glitter Yupo paper and emboss floral image with Altenew 3D Embossing Folder. Add sentiment sticker, gems and ribbon to finish card as shown.

Fancy Folding Dragonfly: Tape the die cut opening onto the fancy folding dragonfly pattern. Working from the back of the card, alternating between the two color/pattern papers to make the dragonfly. Add stamped sentiment, gems and ribbon to finish card.

Thinking of You Daisies: Adhere removable tapes on the left and bottom corner of white card stock. Sponge on yellow and orange ink. Leaving the tapes on, stamp daisies image with black ink. Add stamped sentiment, ribbon and gems to finish card as shown.

Thanksgiving Leaves: Tape stencil onto tan card stock and sponge open area of stencil with clear VersaMark ink. Remove stencil and brush on gold, copper and green Perfect Pearls powder. Brush off excess and spray a light mist of water over the panel to set the powder. Add stamped sentiment, gems and ribbon to finish card as shown.


Spring 2024 - Gel Printing Workshop

Hello everyone, It was so nice to welcome all my new and returning students to my Spring one-day gel printing workshop. Below is a quick rec...